M1 Mac mini desktop upgrade guide: user experience software recommendation and accessory selection
his article will take you to learn more about the real experience and performance of Macmini, and recommend a wave of software and accessories to everyone, hoping to help children who expect to start with Macmini to provide some references and suggestions.

With the iteration of the M1 chip, Apple's Macmini has also achieved a qualitative change and a leap in the support of this processor, and has even become a cost-effective ITX host that surpasses the black Apple. This article will take you to learn more about the real experience and performance of Macmini, and recommend a wave of software and accessories to everyone, hoping to help children who expect to start with Macmini to provide some references and suggestions.
1. M1 Macmini may be the most worthy Mac product!
After watching the M1 processor conference last year, I was stupid. Punch AMD, kick Intel, and more! Poop! should! I just hang up my own product line. But I didn't start with it, but waited and watched for a long time. Finally, after watching a review video at station B, I started with 5,500 yuan on the little yellow croaker.

Why didn't so many previous videos impress me, what's the magic of the last video? In fact, it's very simple. The previous video is either talking about how m1 is fragrant and how fast the video is cut, or there are too many m1 bugs and various problems. The video that really touched me put forward two points: First, the replacement cycle of Macmini is 2 years, which means that M1X can't be counted on. M2 may be a little overhang. Secondly, the M1 chip is so cheap to open up the market, and M1X and M2 do not necessarily have a price advantage. So buy early and enjoy early, and buy late and increase the price more uncomfortable.

Finally, it’s my own reason: I’m not likely to discount the iMac that I just got for half a year for the M2. This year, I guess I can only see the M1X Macbook Pro 14”, and next year I estimate that the M2’s iMac and Macbook Pro 16” will be fine. It can be arranged. So it's better to have a Macmini to try it out. As for the configuration, I chose the combination of 16GB RAM+256GB ROM. The reason is simple: the memory of M1 is packaged on the processor chip and cannot be manually increased. At the same time, the size of the memory determines the life of the hard disk. In addition, my own external storage devices are sufficient, so I don’t need to add money to a 512GB hard drive.
Unexpectedly, the car overturned as soon as I got it. It may be because the previous owner changed the name of the computer, which triggered the ancient macOS BUG: After resetting the system, the administrator authority cannot be obtained, which means that a large amount of software cannot be installed and cannot be invoked. Then I experienced the following tribulations:
①The standard system was reset N times and failed ❌;
②I used Timemachine to restore the iMac backup N times and failed ❌;
③ Apple Configurator reinstalled the macOS system twice and succeeded ✅.
Therefore, macOS users must not change the system name by hand, the process of tossing is enough for you to drink a pot.
Next, let's talk about the experience of using M1 Macmini. First of all, from the perspective of [industrial design], Macmini should be regarded as one of the most elegant hosts I have ever seen. The texture of Macmini is very similar to that of Macbook Pro. The one-piece aluminum alloy body, square main body + rounded corners + polished logo on the top all show Apple's industrial design aesthetics.

The Macmini's I/O interface is located at the rear, which is also the entrance to its installation. From the point of view of the interface configuration, you can see that it covers the power switch, figure-eight power supply interface, RJ45 Gigabit Ethernet, Thunderbolt 3 × 2, HDMI 2.0, USB 3.2 Gen1 (Type-A) × 2, 3.5 mm headset integrated audio port .
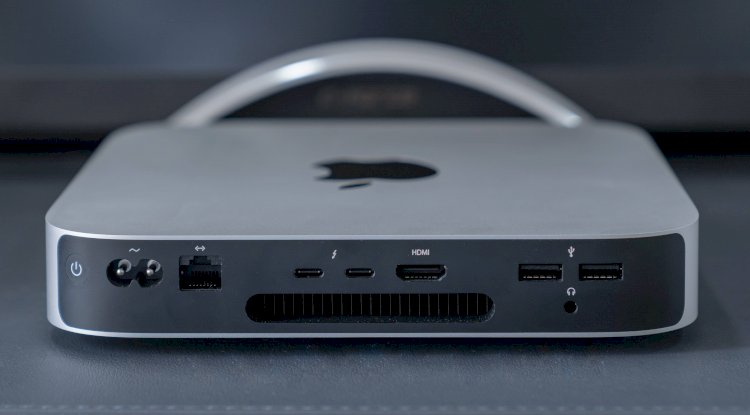
The interface is still quite rich, but the Macmini's Thunderbolt 3 bandwidth capability is more urgent, and the latest version can be equipped with a 10 Gigabit Ethernet port, which is really regrettable. And the M1's memory is integrated next to the CPU, and solid-state soldered on the motherboard, there is no possibility of manual upgrade.
Finally, let's talk about the expansion capability of Thunderbolt 3. The M1 Macmini has limited bandwidth capabilities of the dual-port Thunderbolt 3. If one of your M1 Thunderbolt 3 has been connected to another device, the bandwidth of the other Thunderbolt 3 will inevitably be affected. Therefore, it is impossible to daisy chain and connect two monitors. In contrast, Macbook Pro can do it. This is one of the limitations of the M1 Macmini.

① The two Thunderbolt ports are exactly the same, and the simultaneous insertion can only share the bandwidth, and cannot reach the full speed of 40Gbps at the same time. Basically, don't think about the daisy chain.
②The Thunderbolt interface of M1 Macmini can only output one monitor at most (4K@60Hz/5K@60Hz/8K@30Hz), and the second one can be connected via HDMI 2.0
③Using a docking station or monitor that supports DisplayLink technology can make the Thunderbolt 3 interface output two devices, but basically only two 1080P@60Hz can be achieved

My office desktop is composed of a 35-inch BenQ EX3501R with fish screen and a 15.6-inch C-Force 4K portable screen. The fish screen uses HDMI 2.0 input, and the 4K portable screen uses a direct C to C output through the Thunderbolt 3 interface. The upper part is responsible for reading documents, writing topics and other serious needs, while the small screen at the lower part is reserved for scenes such as chat windows and watching videos.

2. The performance of M1 Macmini may not be as strong as you think!
Next, let’s take a look at [M1 chip analysis]:
Apple’s M1 chip uses 5nm process technology (16 billion transistors). Among the 8-core CPUs, 4 cores focus on high performance, and the other 4 cores take into account high energy efficiency. This SoC also integrates an 8-core GPU with floating-point computing power comparable to Radeon RX 560 and a 16-core neural network engine capable of 11 trillion operations per second, which increases the machine learning speed by up to 15 times.
Finally, M1 also uses a unified memory architecture to increase memory access bandwidth and reduce latency, thereby improving the operating efficiency and energy efficiency of the system.

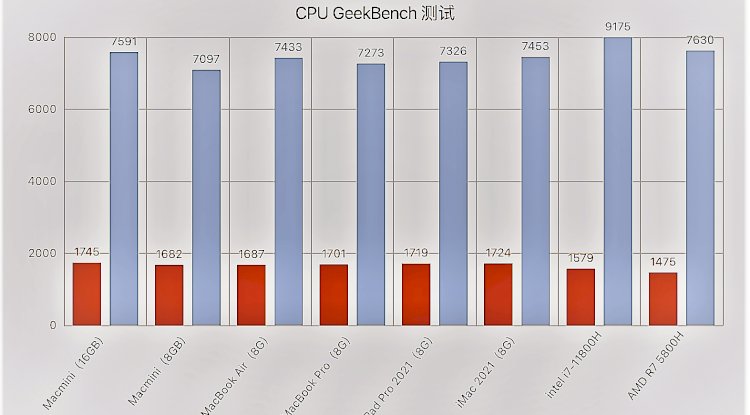
Through the GeekBench 5 test, it can be seen that the Macmini equipped with M1 scored 1745 points for single-core performance, 7591 points for multi-core performance, 1687 points for MacBook single-core and 7433 points for multi-core; iPad Pro 2021 single-core 1719 points and multi-core 7326 points; iMac 2021 single-core 1724 points, multi-core 7453 points. Instead, Macmini has become the best Mac computer for performance release.

Comparing the main processors of the two old CPU manufacturers, Intel and AMD, AMD Ryzen 5800H single-core 1475 points, multi-core 7630 points, intel i7-11800H single-core 1579 points, and multi-core 9175 points. So overall, the M1 chip is the king of single-core performance, but it is even with 5800H in terms of multi-core performance, and then slightly weaker than intel i7-11800H.
In terms of hard drives, Macmini uses an onboard (welded) SSD this time. The 512GB version is about 1,500 yuan more expensive than the 256GB version. In terms of read and write performance, the read and write speeds are both around 3000MB/s.

I believe that everyone is also very concerned about the read and write life of the hard drive. I also used SMART Monitoring Tools to check it. It can be seen that in 5 months, this 256GB hard drive has read 9.01TB and written 7.42TB. In contrast , I have used an iMac for almost 10 months, reading 14.3TB and writing 12.5TB. Although the read and write capacity of Macmini is relatively high, it is within the normal range, so you can use it with confidence.
Finally, in the actual performance, I tested the video export performance of the M1. I imported three 8K (10bit/422) RAW video materials shot by Canon R5 through Final Cut Pro, and the video playback was very smooth. I also put on the LUT and performed some simple color post-processing. The video rendering and export rate is also very good. A 35-second 8K video can be completed in 2 minutes and 20 seconds.
The iMac 2020 (10th generation i7) in my dorm actually only takes 1 minute and 50 seconds. The reason is simple. I used 4 16GB Kingston memory to form a 64GB quad channel for the dorm iMac. So you don't need to worship the M1 blindly, as long as the memory is large enough, the performance of the old processor + discrete graphics card is equally strong. But in contrast, the former only has a quarter of the price of the latter, which is surprising to the M1's price/performance ratio. Overall, Macmini is definitely the most cost-effective Mac computer product, and even the black apple is far inferior to it.
3. Which very good apps did I use for M1 Macmini?
Next, let's give you a wave of APP Amway, some of which I have discovered recently, and some M1 exclusive APPs are also recommended. Let me review it first.
1⃣️【MarginNote3】: First of all, MarginNote3 is my most commonly used. As a PDF artifact, you can enter hundreds of pages of monographs and documents into the APP to read directly. The coolest thing is that it can organize the contents of the page into a mind map , Which means you don’t have to organize your knowledge system separately. It will be more convenient to read "long-length monographs". I personally feel that this function is worth the price.
The Mac version is very expensive. It is recommended that you go to the official website forum to apply for a 40% discount on student education. I sent an email (with student certificate attached) to apply for the education discount. It didn't take long before I received the discount information in the education mailbox. I can activate two Mac computers. If you want to change the activation device, it is also very convenient, just deactivate it directly.
Notability: The second recommendation is Notability. The iPad App ranks first in terms of payment. You can organize your notes and scan papers (instead of paper notebooks). The key is that you can record and type is more comfortable. I usually use it with the iPad Pro. After reading and marking the iPad Pro, I can view and review it on the Mac. And recently it is still on discount, the original price is 60 yuan, the current price is 25 yuan, buy it blood to earn, and the Mac side will not be paid again like MarginNote3, you can download and use it directly.
RD Client: The third recommendation is RD Client: because many friends use a combination of windows computer + Mac / iPad, and they are studying and living in the super large local area network of the campus network. Then using Mac / iPad Pro to remotely control the windows system can solve many problems, such as files falling on the dormitory computer, and some software incompatibility problems can be solved. The picture below is a screenshot of me accessing the Windows interface on the macOS system. When the screen is full, the mouse operation is smooth, and I even feel that I am using a Windows computer.
My younger brother has studied for a long time, and after trying many kinds of software, he recommended this free software produced by Microsoft to me. After use, not only the control delay is very low, but also the picture clarity is excellent, which is far better than the effect of QQ remote control. You can directly use the windows computer to play games on the Mac / iPad Pro. But it should be noted that the remote desktop function is only suitable for the professional version, so how does the home version solve this problem? You can go to search for [Enable Remote Desktop Function in Windows Home Edition]
PLEX: In terms of audio and video playback, because M1 Macmini also supports applications on the iPad, I recommend PLEX to everyone without a brain. The traditional Mac requires an Apple account to download from a foreign server, but now you only need to download the iPad-compatible software in the application store of the Bank of China to install and use. The video resources on my dormitory and even the NAS far away in Chengdu can be fully decoded. .
Audirvana: Audirvana is a treasure app I recently discovered, because it can replace Foobar to decode DSD lossless music or even mastering level, and its playback interface is much more beautiful than Foobar.
For professional users, you can see the decoding capabilities of the current playback device in the preferences, and make personalized adjustments to the low-level audio playback, signal processing, upscaling, audio volume and other options. Moreover, this playback software can also search fixed hard disk areas and even resources in the NAS. I usually use Seagate's external mechanical hard disks.
Gemini: I remember that I recommended to you CleanMyMac X, which is the main Mac garbage cleaning. Later, it launched a software for scanning and cleaning duplicate files-Gemini, which can scan the files under your custom files. All duplicate files.
After the scan is completed, the user will be reminded of the specific duplicate content, and then the user can choose intelligently or manually check the content of the file that needs to be cleaned up. Gemini can be regarded as a good supplement to CleanMyMac X.
Other compatible apps: Because the M1 chip used by Macmini is of ARM architecture, it can be understood as a magical revision of Apple's A series, so iPad / iPhone apps equipped with A series processors can naturally also be used on Macmini, which is considered a With the enhancement of the epic level, the newly released iPad Pro 2021 this year also fully uses the M1 processor.

So what iPad software is very suitable for the desktop? Let me mention a few for your reference, such as the "Mijia" of the smart home category. You can directly turn on the monitoring on the Macmini to keep abreast of the situation. Another example is "knowledge" and "worth buying" in the information category. It is a new model of office fishing. You no longer have to envy the same-screen functions such as Android phones. M1 does not even need to turn on the phone. It will be used to snap up specials in the future. It became extremely relaxed.
4. These accessories should help you enjoy M1 Macmini more comfortably?

Vertical stand:
Originally, I was optimistic about the docking station shown in the picture below for Macmini, but it did not support Thunderbolt 3, and there was a huge gap between the Macmini and the docking station in the buyer's show, and I was instantly dissuaded from it. What a pity! It had the opportunity to become the most recommended accessory.
And my desk space is still relatively tight, so I chose the cheapest aluminum alloy vertical stand. I bought one at home and reserved it for MacBook Pro and iPad Pro. I didn’t expect it to be wide enough to fit directly into the Macmini. . I bought a dual-slot, and the Thunderbolt 3 docking station can be placed on the other side.

In general, after using this vertical stand, the original cramped environment layout is a little wider, but the APPLE logo lying down is a bit of a pity. After all, the MacBook is upright when it is standing, and it turns out that the notebook is upright. It's a serious gameplay, I can only be regarded as nonsense.

BenQ ScreenBar Halo screen hanging light:
Because Macmini doesn't have the ability to automatically adjust the brightness like my dorm iMac, so long-term use, the eyes are still easy to fatigue, then we can use the external light source to optimize the adjustment. So this time everyone should see that my desktop has also added a set of screen hanging lights, this product is derived from BenQ's third-generation screen hanging lights-ScreenBar Halo.
I have used BenQ ScreenBar and ScreenBar Plus. The two generations of products have left a deep impression on me. The first generation of products can be regarded as a precedent for the screen hanging lamp, which has attracted many friends around to start. After all, every digital enthusiast's desk is full of 3C products, large and small, and the appearance of screen hanging lights has achieved a perfect balance between desktop storage and lighting.
But with the current increase in similar products in the industry, BenQ is also facing considerable competitive pressure. BenQ did not choose to lower the quality and launch a cheap version to compete with other products. It still continues its high-end route positioning. So how does ScreenBar Halo build its own moat? In fact, there are three main directions: industrial design, asymmetric light path, excellent lighting performance and intelligence.
The "industrial design" of BenQ's screen hanging lights should be regarded as its first advantage. Competitor manufacturers often imitate most of them, and it is difficult to see beyond. This time, ScreenBar Halo has added a gravity pivot hanging gear design, which is significantly improved compared to the previous generation of screen hanging lights. In the past, users often told BenQ about the compatibility of curved screens with screen hanging lights. ScreenBar Halo can be perfectly compatible this time, it provides a special accessory for curved screens, which can flexibly adapt to the screen thickness of 0.7-6cm.

In addition, BenQ ScreenBar Halo showed off a muscle on the remote control this time. The previous generation was still a wired button design. The new remote control has been transformed into a 2.4GHz wireless touch operation. It is worth mentioning that the buttons use industrial precision bearings, which can be easily rotated with a single finger, and the rotation is comfortable. Other brands of wireless remote control must be turned with two fingers, and the turning feel is more blunt.

Of course, the ingenuity of the remote control does not stop there. BenQ ScreenBar Halo also added five touch buttons and a sensor to the remote control. The touch button in the middle is the power switch, the upper left corner is the color temperature adjustment, the upper right corner is the brightness adjustment, the lower left is the smart dimming, and the lower right is the preference. Just below is a wake-up sensor, which can be achieved by gently waving the remote control with your hand. wake.
On the outermost layer of the remote control, there are 16 LED lamp beads forming a ring to indicate the adjustment range. In the past, when adjusting the brightness and color temperature of the light source, it was often only possible to rely on the naked eye. With the indication of the LED lamp beads, precise control can be achieved.
The "asymmetric light path" of the BenQ screen hanging lamp is a patent that competing manufacturers must avoid. Because the screen hanging lamp is the most easily affected by the screen, the symmetrical light path design has two problems, the mirrored screen will reflect light; secondly, the brightened screen will increase the contrast with the surroundings and increase the burden on the eyes. Therefore, the screen hanging lamp should illuminate the desktop as much as possible without touching the screen to avoid reflections on the screen and the frame. The BenQ screen hanging light cleverly enhances the brightness of the desktop area, but it restricts the light source facing the screen as much as possible. This is evident from the contrast effect of the picture below .
(Note: The picture below is ScreenBar Plus)

BenQ ScreenBar Halo further optimizes the light path on the basis of Plus. It adopts a patented combined curvature reflection optical design + 16.5° tilted translucent lens, with a light-absorbing cotton dimming structure, which makes the light path clearer and further reduces the impact on the screen. small. According to official data, Halo has at least 50% less glare than the second-generation Plus, and light uniformity has also increased by 11.5%.
At the same time, BenQ ScreenBar Halo also added a back light source, and a special lampshade material at the tail can illuminate a large area evenly. The light is soft and not dazzling, even if the human eyes look directly at it, there is no problem. Of course, this lamp is not for people to see, it has other profound meanings. Because the display is self-luminous, and outside the display is dependent on the ambient light source, if the display is bright and the ambient light source is too dark, it will cause eye fatigue or even damage.

BenQ ScreenBar Halo can freely switch between 3 fill light modes: front light, rear light, front and rear lights, front and rear fill light can reduce glare. If you can choose to turn off the main light and turn on the ambient light when you are watching movies or playing games, you can not only achieve immersive lighting experience, but also achieve a certain eye protection effect, which is very useful for night watching or game scene experience.

Lighting mode adjustment: single-on backlight can be used as ambient light; both front and rear lights are turned on as a choice when using the screen, which can balance the ambient brightness before and after the screen to reduce the contrast between light and dark in the line of sight; single-on front light is mainly used When reading in front of the screen, the light is at the highest brightness.
The second item is "excellent lighting performance". In traditional lighting judgment, we often use Lux, an illuminance indicator, to measure the brightness of the light source. It is generally believed that the best desktop illumination for paper reading should be> 500 Lux, which can be achieved by most screen hanging lights. The center illumination of BenQ ScreenBar Halo in headlight mode can even reach up to 800Lux. But being bright does not mean you are comfortable to see. Because the color temperature, the color rendering index of the LED light source, and the illumination range will affect the final lighting experience.

Brightness adjustment: The transition of brightness adjustment is very smooth, and both the main light and the atmosphere light can be adjusted simultaneously
Color temperature adjustment has always been an important function of screen hanging lights, because in this era of 996 Fubao and 007 internal scrolling, workers often need to sit in front of the computer from morning to night. During the day, it is best to maintain the international general color temperature standard of 6500K, which is the average color temperature of noon sunlight in a year. In the afternoon or even late at night, the color temperature of the light source is recommended to be warmer, mainly to avoid the short-wave blue light of 400-455nm from damaging the health of the eyes. BenQ ScreenBar Halo offers 2700-6500K color temperature options, and both the main light and the ambient light support the stepless adjustment of cold and warm dual colors.

Color temperature adjustment: BenQ ScreenBar Halo achieves different color temperature changes by adjusting the brightness of the cold and warm LED lights
We often use Ra to define the "color rendering index". Sunlight is the most ideal reference light source. Its color rendering index is defined as 100. We use 8 standard color samples with medium chroma to test. The deviation degree of the 8 colors under the same color temperature standard is used to measure the color rendering index of the light source and take the average deviation value. The larger the average color difference, the lower the Ra value. BenQ ScreenBar Halo has a color rendering index of Ra> 95, which has basically been able to meet the color rendering requirements of photographic equipment and can truly restore colors.
BenQ ScreenBar Halo also has a 35° lamp head angle adjustment, so that it can be adjusted according to the height of the monitor and the depth of the desktop. And thanks to the excellent light path design, this screen hanging light can achieve a large range of light supplement. According to the official statement, under the illumination of 500Lux, the color temperature can cover 65cm × 40cm when the color temperature is 4000K, and the color temperature can cover 70cm × 42cm when the color temperature is 6500K, which is just enough to cover my desktop.
The fourth moat of BenQ ScreenBar Halo should be its excellent "intelligence", which is also the important factor that competitors can only learn from the appearance and cannot touch the inner. An ambient light sensor is built in the middle of the screen light. By clicking the smart dimming button on the remote control, the sensor can be used for real-time ambient lighting. In the headlight mode, it can intelligently supplement 500 Lux illuminance in real time. I personally turn it on all the year round, which is very practical. 500Lux is also an ideal value for high-precision tasks such as reading in the national illuminance standard. If you mainly work with a monitor, you can turn on the front and rear lights at the same time to balance the brightness of the front and back of the screen. If you are watching a movie or playing games, you can only turn on the ambient light at the back to reduce the brightness difference and the burden on your eyes.
Generally speaking, after the desktop has BenQ ScreenBar Halo this screen light, it still adds a lot of color to my entire desktop.
LaCie Thunderbolt 3 Mobile Solid State Drive:
The next thing I want to introduce to you is the Rugged SSD Pro Thunderbolt 3 mobile solid state drive from LaCie. This mobile solid-state drive is amazing. LaCie is a professional manufacturer of high-end external storage devices and was acquired by Seagate in 2012. Its positioning is similar to that of a light luxury brand in the storage industry, and it can be regarded as an extension and supplement to Seagate's high-end category. LaCie's products have two characteristics-expensive and durable.

The Rugged series are LaCie's three-proof models, covering both mechanical hard drives and mobile solid state drives. What you see more often is the orange model in the picture above, and my black is the top-matched Thunderbolt 3 interface. As for its price, 1TB costs 3699 yuan, 2TB costs 6399 yuan, it is really not cheap, basic You can get the latest M1 MacBook Air (8GB/256GB) if you add a little money to the 2TB version.
When connected to the computer, a white LED indicator will light up next to the port of LaCie Rugged SSD Pro

So why LaCie Rugged SSD Pro has the guts to sell so expensive, I think it can be explained from two aspects. On the one hand, its design, 98mm (length) × 65mm (width) × 17mm (thickness), is Quite portable. And please note that the inner layer of this mobile solid-state hard drive is made of metal, and the outer body is covered with silicone protection. It has reached IP67 waterproof and dustproof, 3 meters drop resistance, and 2 tons pressure resistance. If you fall into the water in the outdoor hard disk, Or if you are crushed by a car, you can use it with confidence. If the traditional hard disk has been waiting for after-sales, you can only hope to save some data.

On the other hand, LaCie Rugged SSD Pro uses the Thunderbolt 3 port, and according to the official statement, the transmission performance has reached 2800MB/s. PS: Thunderbolt 3 points to the data bandwidth of 22Gbps, which is 2750MB/s when converted. The actual reading speed of LaCie Rugged SSD Pro is around 2600MB/s, and the writing speed is around 2100MB/s. This is an external mobile hard drive. In contrast, our common USB 3.2 Gen 2 port NVMe mobile solid state drive reads and writes. The performance is about 1000MB/s, and the gap is evident.
Because of such strong read and write performance, LaCie Rugged SSD Pro is specially designed for movie production and editing scenes. It can be used to render high bit rate RAW content, such as 8K and super slow motion source files. In the past, these materials were only Smooth playback and high-speed rendering export can only be achieved in the built-in flash memory space. In the previous article, I tested that it took 2 minutes and 24 seconds to export a 35-second 8K video on the Macmini, while the LaCie Rugged SSD Pro was used to directly edit and render the material. The video playback was still extremely smooth, and it took only 2 minutes and 26 seconds. It can be seen that the external lightning equipment can also achieve performance close to that of the built-in hard disk, which is very friendly to professional users who need to process high-bit-rate videos.
For scientific researchers + content creators like me, I am actually quite afraid of data loss. One of my Ph.D classmates had a damaged Surface, and he couldn't even repair it. His graduation thesis was directly suspended for a month. It's also the blame for him not using OneDrive to back it up in time. For Mac users, you can actually use TimeMachine to back up directly to an external LaCie Rugged SSD Pro. Or you can also use Toolkit’s smart backup function. I often keep this desktop backup folder consistent with Synology Sync. This way, three-terminal synchronization of NAS, computer, and mobile solid-state drive can be achieved without worrying about data loss. The problem.
Finally, if it is really unlucky, if you encounter a LaCie Rugged SSD Pro hard drive damage, don't worry too much. Because this hard drive has a 5-year warranty for the whole machine, and there is a free original Rescue data rescue service during the warranty period. Therefore, I think these are the reasons why LaCie Rugged SSD Pro has the guts to sell so expensive. Make it hard, boy!

Belkin three-in-one wireless charger:
The fourth one I will introduce is a set of Belkin's three-in-one wireless charger, which was originally reserved for desktop upgrades, but now I will show them together when I have time. Belkin believes that everyone is familiar with this brand. It is an important partner of Apple and the first third-party brand to launch MagSafe accessories. And his family's warranty policy is relatively solid, only replacement for two years without repair.
I remember that when I was writing the public test of the iPhone 12 Pro, I mentioned that Magsafe is a major feature of the iPhone 12 series. Charging is not as fast as wired and not as convenient as wireless. But it may be because Apple hasn't mastered the correct usage method, and this Belkin product is a more suitable solution.

Belkin’s three-in-one is a customized charging solution for the fruit fan family bucket, which can meet the needs of charging mobile phones, watches, and earphones at the same time. On the left is Magsafe with a peak power of 15W (both horizontal and vertical), on the right is the charging position for Apple Watch, and on the bottom is a large-size wireless charger. In addition to AirPods, it can also support other devices compatible with Qi fast charging protocol.
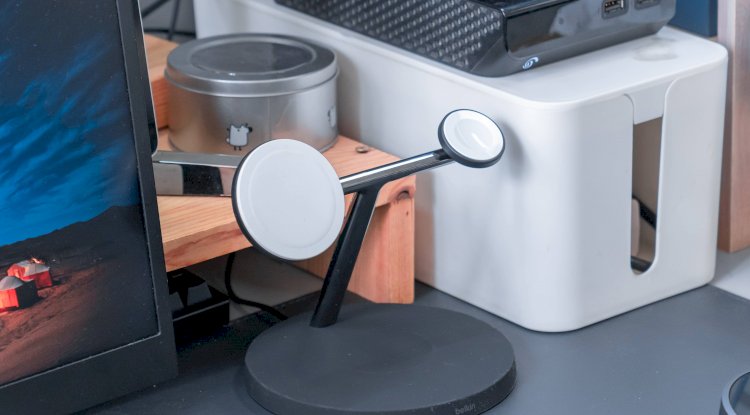
It can be seen that the iPhone 12 Pro shows a brand new Magsafe charging animation after putting on the charger, and the Apple Watch 5th generation has also entered the digital display charging state. When the AirPods Pro is placed on the bottom, the LED charging indicator shows white, indicating that it is also charging. If the LED light is orange, it means that the wireless charging is misaligned or blocked by a foreign object.
The MagSafe charging position of Belkin's product is officially certified by Apple and is perfectly compatible with the iPhone 12 series. It can also be fitted with Magsafe protective sleeves.

Overall, Magsafe’s suction power is just right. Even the iPhone 12 Pro with the Magsafe protective case can be stably attached to the top. At the same time, if you push outwards slightly, you can easily remove it. Compared with Magsafe that uses cables, Belkin's design ideas are much better.

Moreover, this charging stand uses a triangular structure design, the cables are hidden inside the branches, and the power supply cables at the bottom are also semi-hidden.

From the perspective of the bottom, you can also find that the charging head socket is an anti-plugging corner design. Before I was using a wireless charger from another home, I often found that the tail cable was accidentally torn off, and the charging process of the wireless charger was also relatively slow. When you notice the power failure, it will delay a lot of work, Belkin will I noticed and solved this pain point very well.

Finally, let’s take a look at the power distribution of the Belkin 3-in-1 wireless charger. The output power consumption of the entire charger is 25W. The Magsafe interface of the iPhone is divided into 15W, the Apple Watch charging port is divided into 5W, and the bottom wireless charger is divided into 5W. Of course, Magsafe only has 15W for real men for a few minutes, most of the time it is 10W. Therefore, Belkin can consider in future designs to allocate more power consumption to the bottom wireless charger. It is best to be compatible with QI's 15W wireless charging standard, so that even Android phone users can enjoy a high-speed charging experience.

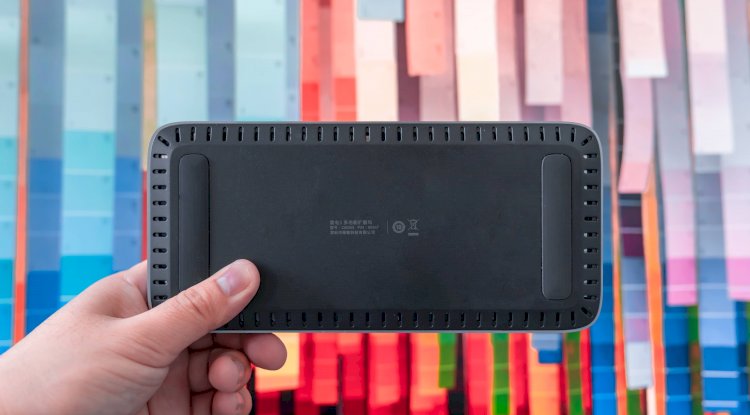
Green Alliance 10 in 1 Thunderbolt 3 Multifunctional Docking Station:
The last one to introduce to you is a 10-in-1 Thunderbolt 3 multifunctional docking station from Green Union. In fact, if you save a little bit, Macmini does not need to consider an external docking station. But I personally have professional peripheral needs, so the docking station will be more flexible.

First of all, from the perspective of styling, the Greenlink Thunderbolt 3 docking station is different from the common vertical design, and it pursues a flat style. At the same time, the top and middle frame are made of one-piece aluminum alloy material, which has an excellent matte texture and also has the advantages of anti-fingerprint + fast heat conduction.

The word "UGREEN" is also printed on the bottom right corner of the top, and the big word "THUNDERBOLT" and the lightning symbol are also printed on the middle frame on the side.

The bottom of the Greenlink Thunderbolt 3 docking station is made of engineering plastic, and the edges are reserved with hollow heat dissipation holes, which can quickly dissipate heat. The left and right foot stickers can also play a certain support and anti-slip effect on the desktop.
As a docking station, this product also provides a very rich I/O port. From the front, it includes an LED indicator, 3.5mm headphone jack, SD/TF card slot (SD 4.0 protocol, support 2T memory card, write 225MB/s, read 290MB/s (Max)), 1 USB 3.2 Gen1 (Type-A/5Gbps) and two Thunderbolt 3 ports.
The Greenlink Thunderbolt 3 docking station uses Intel’s certified JHL7440 Thunderbolt 3 main control chip, and the USB-C port controller is Cypress CYPD5235-96BZXI, which can guarantee stable transmission with a maximum bandwidth of 40Gbps. One of them is responsible for connecting to computer input (supports PD 60W reverse charging), and the other can be responsible for daisy chain output or 5K@60Hz, 8K@30Hz video output. But because of the bandwidth limitation of M1, don't even think about the daisy chain.

From the back, the interface also includes a DC power supply port (24V/5A), 2 USB 3.2 Gen1 (Type-C), 1 DP1.4 (8K@60Hz), 2 USB 3.2 Gen2 (Type-A) ) And RJ45 Gigabit Ethernet port.
When I actually use the Greenlink Thunderbolt 3 docking station, although it does not support vertical placement, fortunately, the vertical stand I started in the front can take on this function. I simply plugged the docking station behind the Macmini, and the SD card reader slot that I often used was all right, and the 30cm Thunderbolt 3 data cable was also fully utilized. Of course, if you pair it with the 2-meter-long Thunderbolt 3 data cable that I have shown you before, you can place the Greenlink Thunderbolt 3 docking station in a more suitable position.

Finally, I also used the LaCie Rugged SSD Pro that I showed you to plug into the Thunderbolt 3 port of the Green Link Docking Station. The measured read and write data is not much different from directly connected to the computer. The premise is another Thunderbolt of the Macmini. 3 The port is idle. I sincerely hope that the next generation of M1X and even M2 can solve this problem. For children's shoes with thunder and lightning equipment like me, without the support of daisy chain, it is like life is bleak

What's Your Reaction?