Mastering Excel: How to Create a Drop List with Ease
Creating a drop list in Excel can greatly enhance the functionality and usability of your spreadsheets. By adding a drop list, you can provide users with predefined options to choose from, eliminating the risk of data entry errors and ensuring consistency. Using drop lists can be particularly useful when creating forms or reports that require consistent data entry or when sharing spreadsheets with others who may not be familiar with specific values or formatting requirements. By incorporating this feature into your Excel spreadsheets, you can streamline data entry processes and improve overall efficiency in managing and analyzing your data.

Introduction:
Excel is a powerful tool that offers a wide range of features to enhance data management and analysis. One such feature is the ability to create drop lists, also known as drop-down menus, which provide users with a convenient way to select data from pre-defined options. Whether you are organizing data, creating forms, or simply streamlining your workflow, knowing how to create drop lists in Excel can greatly improve your productivity.
In this article, we will guide you through the step-by-step process of creating drop lists in Excel. We will also provide visual aids in the form of images to ensure that you can follow along easily. By the end of this article, you will have the knowledge and skills necessary to create dynamic and user-friendly drop lists in Excel.
So let's dive right in and discover how you can harness the power of Excel's drop list feature!
Step 1: Prepare Your Data
Before creating a drop list, it is important to have your data ready in an organized manner. This could be a list of options or values that you want users to select from. Ensure that your data is arranged either on the same worksheet or on a separate sheet within your Excel workbook.
Step 2: Select the Cell for Your Drop List
Next, choose the cell where you want your drop list to appear. This cell will serve as the input field for users to make their selections.
Step 3: Access Data Validation
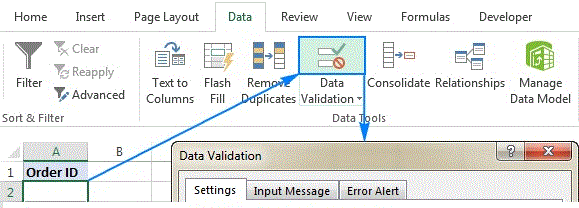
To create a drop list, we will utilize Excel's Data Validation feature. To access this feature, navigate to the "Data" tab on the ribbon at the top of your Excel window and click on "Data Validation."

Step 4: Define Your List Source
In the Data Validation dialog box that appears, go to the "Settings" tab. Under "Allow," select "List" from the drop-down menu. In the "Source" field, either type in the range of cells containing your data or click on the small icon to select the range directly.
Step 5: Apply and Test Your Drop List
Once you have defined your list source, click "OK" to apply the drop list to your selected cell. You will now see a small arrow appear next to the cell, indicating that it contains a drop-down menu. Clicking on this arrow will display all available options for selection.
Conclusion:
Creating drop lists in Excel is a valuable skill that can greatly enhance your data management capabilities. By following these simple steps and utilizing Excel's Data Validation feature, you can easily create dynamic and user-friendly drop lists for various purposes.
Remember, drop lists not only provide a more organized approach to data entry but also help reduce errors and ensure consistency in your work. With practice, you will be able to create sophisticated drop lists tailored to meet your specific needs.
So why wait? Start exploring Excel's powerful features today and unlock its full potential by mastering the art of creating drop lists!
What's Your Reaction?


